Like all sewists, I have way too much fabric in my stash. Included in that stash is an overflowing drawer of remnants that are too large to throw away but just too small to be used for any reasonable sized garments and three boxes of scraps and junk waiting to be harvested for material.
What to do with all that cabbage?
Why not use it all anyway? I started looking into quilted patchwork garments and decided that I liked what I saw and to make one myself. This is also going to be another opportunity to dig into something from The American Garment Cutter. I’m having way too much fun with that book. This time I want to try making one of Regal’s waistcoat patterns.
Drafting the Waistcoat Pattern
Since my patchwork waistcoat will definitely not be worn with a jacket, I decided on a notch-collar lapel waistcoat. In Regal’s day it would have been fine to wear such a waistcoat with a jacket, nowadays its generally seen with waistcoats that don’t have a matching jacket.


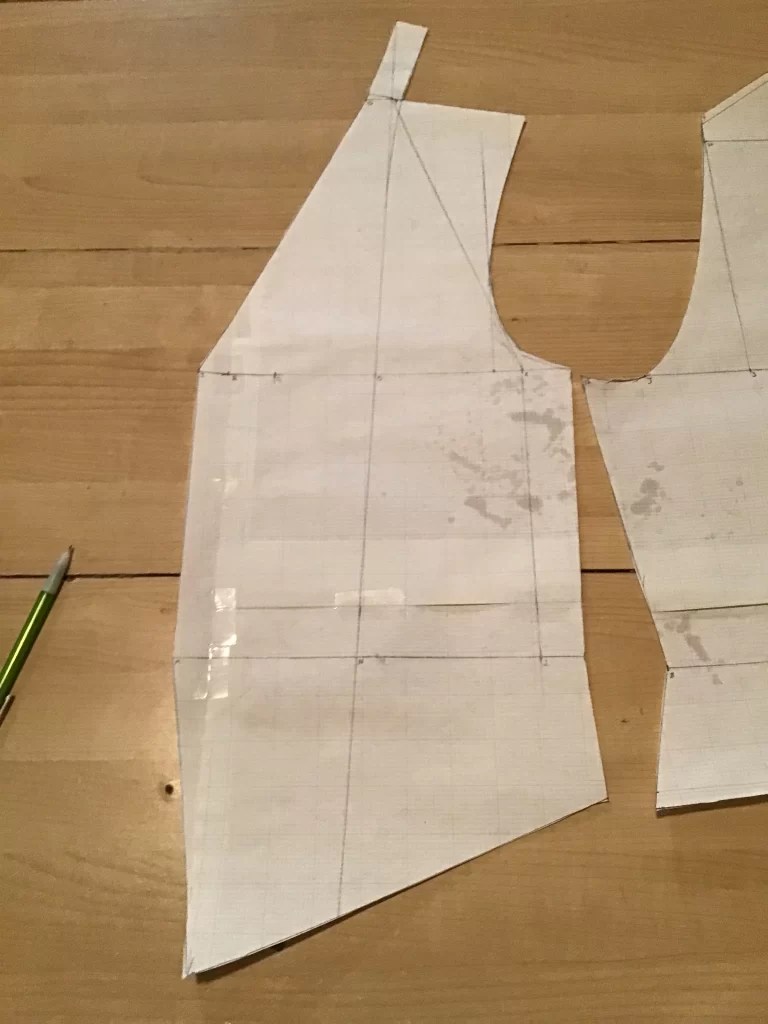
As usual, Regal skips several steps. Some of the missing steps appear in Diagram 122, the basic single-breasted waistcoat, but even that has a number of assumptions that aren’t explained anywhere in the book. I had to fill in as best I could by looking at Regal’s drawing and guessing. This is fine.
Preparations
With a little more tracing I can convert the initial draft into separate pattern pieces for the front, back, lining, facing, and collar. In retrospect, I probably overcomplicated this part of it, but that’s all part of the learning process.
What’s really important is the finished garment and the material that goes into making it. I used three basic techniques to piece together my patchwork waistcoat.


I started off by taking my giant pile of scraps and separating them into categories; I knew that I needed at least one pile of heavy material and another pile of lighter fabric. I also wound up discovering that I had a huge pile of pieces that were still too small to be usable even for patches and so much black fabric leftover from all my Orville Uniforms that the black scraps deserved their own separate pile.
The Front
I used the “heavy” pile for the front portion of the waistcoat. This was mostly denim salvaged old jeans and canvas from a backpack that was beyond repair, along with some remnants from the Sokka costume. For this one I decided to trim each piece into a rectangle or square, so that they could all match up at right angles to each other. I laid out these square puzzle pieces over the front panel pattern until they overlapped in a way that covered the entire panel.


It took some puzzling around to figure out the best way to stitch the patches together that would avoid having to make any weird corners, the whole point of cutting everything to right angles was to have only straight seams. I used a 1/4″ seam allowance for the patches and, after doing each seam, I went back and overlocked the patches together before pressing the seam allowance down. It was probably unnecessary, but I was feeling paranoid about original scrap pieces fraying.
Once finished, I placed the pattern piece over the newly created patchwork fabric and traced it out and then added a 5/8″ seam allowance all around. I cut the front panel out of the quilt I’d created and relegated any remnants of that into the bag of scraps that were too small even for this project. We’ll come back to that bag another time.
The Back and Lining
I used lighter material for the back than the front. These fragments are mostly leftover linen from the Aang and Katara costumes we did a few years ago. This is still pretty coarse, heavy material, but much lighter than the front panels.
By a quirk of the design of those two costumes, I ended up with very long, thin remnants. It was too much fabric to just throw away, but too narrow to be used, even for face masks. Because these were already quite long, I decided to skip the part where I trimmed them to form right angles. This resulted a bit more work required to piece them together and in a bit more eclectic look to the finished panel.


I also decided to cut the back on the fold, rather than using a center back seam as Regal instructs. I added the lower back indentation as a dart, instead. The whole thing adds to the eclectic look the back piece of this garment is taking on.
I made the lining using the same method, but with the lightest fabric in my cabbage stash. This was mostly cotton from various old projects and some old sheets.
The Facing
I used a third method to make the facing. For this I wanted to try to put all the tiny scraps to use. Because the facing will be interfaced, I decided to cut the pattern piece out of interfacing first and then piece together the facing fabric on top of the interfacing. I used iron-on interfacing and simply ironed over the finished puzzle to hold the pieces in place.


After the facing cooled, I went over all the intersections with an applique joining foot and hemstitch. I left just a bit of overlap on the patches, to make sure the interfacing wouldn’t poke through, and the hemstitch holds both sides of each join down. I’m pleased with the result.
From here I put together the outside and lining/facing and bag lined the garment. I attached the lining to the main garment, right sides together, leaving the sleeves and back bottom open. The bag that donated the blue canvas also had this light blue bias tape on all of its seams. I stitched the tape to the openings, going through both the main and lining fabric.


The last step was to secure the new bottom and armhole facing down to the lining. I did this bit by hand with felling stitches while killing some downtime at work. Felling the facing ensured that the stitches wouldn’t be visible on the right side of the waistcoat.
Finishing
I had these wood buttons left over from another old project and used some contrasting orange thread for the button holes. The weight of the canvas and interfacing called for sturdiest needle I have.


With that, my new patchwork waistcoat was done. Seriously, that’s it. The whole process only took a week. I started drafting on Monday and finished up the buttonholes Friday afternoon before wearing it to a dance party that evening. It’s a little warm to dance in, thanks to all the canvas, but otherwise pretty comfortable.
I’m thinking about putting some patch pockets on the front, along with various other possible additions I might make eventually. Maybe a watch pocket, so that I can wear a gold chain on the front and make it even more ridiculous. I’m also not totally thrilled with back collar. I might go back and redo that or even add a hood if I’m feeling particularly silly. Would a hooded patchwork waistcoat make me look too much like a JRPG character?
I definitely intend to keep working through all my cabbage over the course of the next few weeks, and want to see what else might be possible. With all that black scrap laying around, I could do another one of these all in black. An all black patchwork waistcoat might be too Burtonesque though. Not my aesthetic, but I might know people who would go for it. I’m also thinking of making a patchwork skirt to match the patchwork waistcoat.
That’s all for someday, though. For the moment, I’m pretty happy with this garment and am already wearing it around casually.
Stay tuned for the next scrapbusting adventure!

3 responses to “Sewing A Patchwork Waistcoat”
[…] Yet. My new scrap-busting adventure is to turn all the pieces that were too small to be used in my patchwork waistcoat into stuffed animal filler. Why bother buying polyfill when all this free stuffing is right at my […]
[…] on in my scrapbusting adventures, I wanted to make a matching flat cap to go along with my patchwork waistcoat. Not breaking any new ground here, this is already a pretty popular style, but it’s another […]
[…] that I have an awesome patchwork waistcoat and matching flatcap, I need some trousers to complete the ensemble. Jeans are the obvious choice, […]